All about the Cashinotech CSN-A2-T Thermal printer
We've been using the CSN-A2-T in a few projects, like the Thermobooth and the Polatherm. It seems to be a quite popular device because it's easy to work with and beacuse thermal paper is extremely cheap.
The CSN-A2-T is a thermal printer that's very easy to interface from any electronics project involving at least a simple microcontroller. Printing is pretty straight forward - all you have to do is apply a voltage between 5 and 9V on the power pins and send text to the serial RX pin at 19200 baud, 8 bits, no parity. Unless you want to get information like voltage and temperature back from the printer, you don't even need a return channel (TX on the printer) in your setup.
The voltage
Something nowhere to be found on the net - maybe I didn't look hard enough though - is how different voltages affect the printing process. For the first tests I powered the printer straight from the USB port. It works just fine but the print speed is much higher if you supply it with 9V. Note that there is no (visible) difference in print density or darkness, it's just the speed. At higher voltages the current draw is much higher. At 5V it runs fine from a USB-Port - even trough the polyfuse on an Arduino, so I the current has to be around 500mA, Didn't measure it. If you supply it with 9V the current can go as high as 1.5A! At higher voltages, even if it's just slightly over 9V, like 10V, the printer refuses to print at all - probably to protect the heating elements from burning out. The current draw depends on what you are printing. The darker, the more current is drawn. Also the printing process takes longer if there are more black pixels. Note that more black pixels and higher print speed lead to a higher print-head temperature. If it gets too hot, you'll get black smears all over the output.
The baud rate
 The serial interface comes with a default speed of 19200 baud. There's nothing in the documentation about changing the baud rate. And there's a good reason for setting it so low: The printing speed. The printer has an internal buffer that's quite large but it doesn't do any handshaking. There's no RTS/CTS, no XON/XOFF, nothing. At 19200 baud it's almost impossible to write data faster than it can be printed out. But that's only valid for text which has a very low printing density. The printer can also print bitmap images. If you send a very dark bitmap at 19200 baud and you are running the printer at 5V, there is a danger of overflowing the buffer. If you are using 9V or printing mostly white pixels it's fine. But when this buffer overflow happens the printer doesn't just hickup and print garbage - no the firmware completely crashes! You have to power-cycle the printer to get it working again! If you want to enjoy the benefits of a higher print speed there is a way to raise the baud rate up to 115200. You need a Windows machine (A VM is OK too) and this configuration utility.
Since I couldn't find a serial TTL-Adapter cable I used an Arduino to connect the Printer to the PC. Never use a regular RS-232 cable since this will fry the printer! The sketch on the Arduino doesn't matter, you can use one from an existing project, or a blank one, we're not going to overwrite the flash memory. It just has to be a Duemilanove or Uno. The wiring goes like this:
-
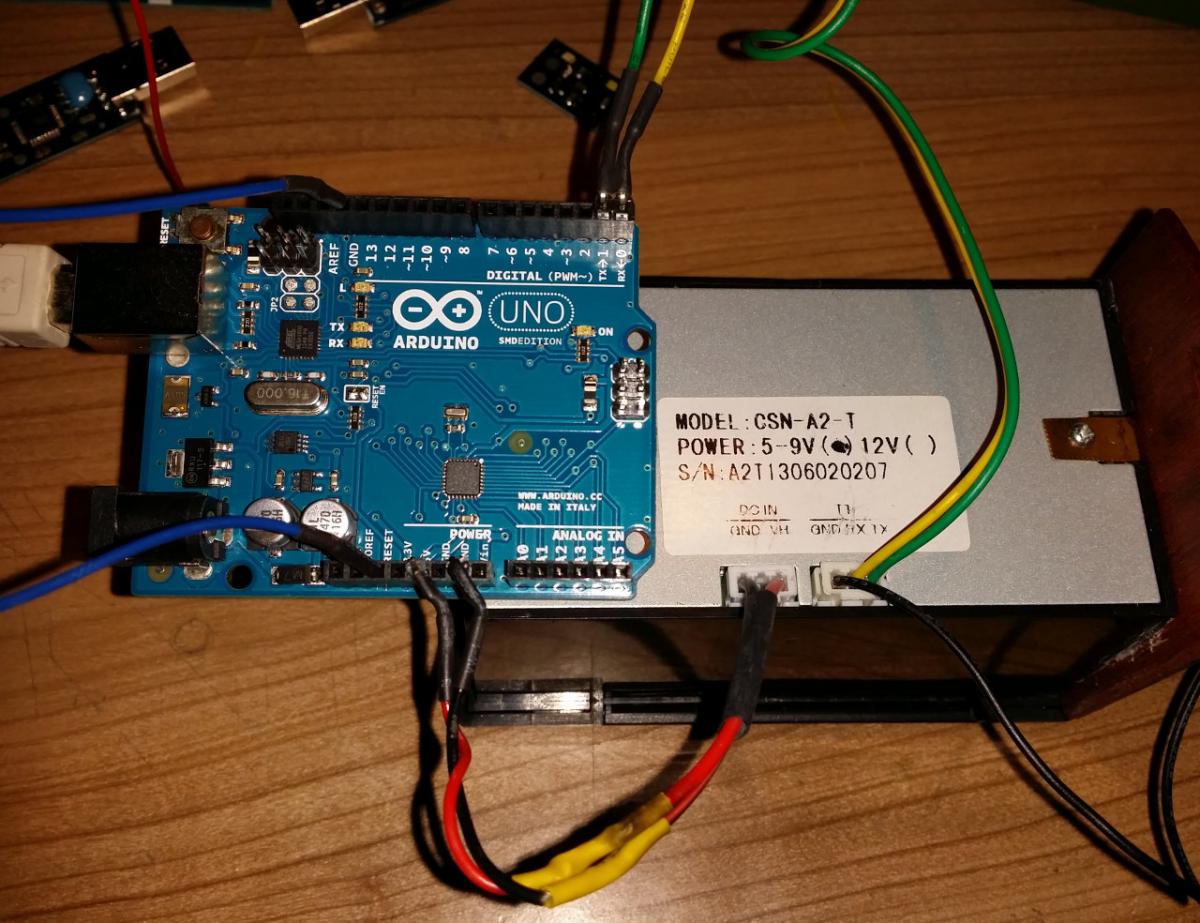 TX from the Arduino to TX on the printer
 - RX from the Arduino to RX on the printer
- GND from the Arduino to GND on the printer
- 5V from the Arduino to VIN on the printer
- RESET from the Arduino to GND on the Arduino
By clamping down the reset wire the main MCU on the Arduino is kept in a switched off-state. That's also why we are not crossing over RX and TX - we're communicating directly with the serial interface, not with the MCU.
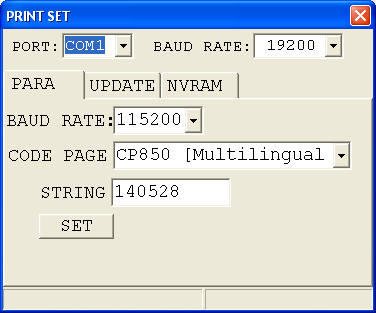
Then open the configuration tool and select the current baud rate, the settings you like and click the button. To find out the current settings hold down the paper feed button on the printer and power-cycle it. It should print out a test page with the current baud-rate and charset.
Connecting the printer to an Arduino
If you want to print from an Arduino just wire the GNDs together and TX from the Arduino to RX on the printer. Set it up with:
Serial.begin(19200);
and print stuff with:
Serial.println("DKIA is great!");But just look online, there's lots of info on connecting those two.
Connecting the printer to a Raspberry PI
The Raspberry PI has a serial port which runs at 3.3V, the printers serial port runs on 5V. That's fine as long as you only want to send data to the printer (TX on Raspberry, RX on printer) since a 3.3V "high" is still interpretet as "high" on 5V logic. But never connect the printers TX line to anywhere on the Raspberry since it will certainly fry the SoC! If you configure the printer to run on 115200 baud you don't have to setup the serial port since that's it's default configuration. Just open /dev/ttyAMA0 and write stuff to it, like:
echo "DKIA is great!" > /dev/ttyAMA0
To change the baud rate on the Raspberry use this:
stty 19200 < /dev/ttyAMA0
But you probably want to edit /boot/cmdline.txt and remove the "console=ttyAMA0,115200", otherwise all the log messages from the boot
process get printed out every time you switch it on. I just couldn't figure out how to remove the "Uncompressing Linux... OK, now booting the kernel" message. But that's OK for our use case.
Neuen Kommentar schreiben